TL;DR:
- Using chlorine-free water with moderate minerals and TDS near 150 ppm is ideal for home coffee brewing.
- Testing your water’s TDS, alkalinity, and chlorine levels first helps achieve consistent, high-quality results.
The single best default for home brewers: use chlorine-free water with moderate minerals, targeting moderate total dissolved solids (TDS) within the recommended range. If your tap water is chlorinated, a carbon filter gets you most of the way there. For café-level consistency, reverse osmosis (RO) plus remineralization is the gold standard. The Specialty Coffee Association sets the numeric benchmarks the industry runs on: TDS near 150 ppm within the industry’s recommended range of 75–250 ppm, zero chlorine, and a pH in a near-neutral range.
Quick actions:
- Tap water smells of chlorine? Run it through a carbon filter before brewing.
- Need a fast fix without equipment? Grab a bottled spring water with a TDS between 75–250 ppm.
- Want repeatable, café-quality results? Set up an RO system and remineralize with a measured mineral recipe or packet.
Table of Contents
- What do TDS, hardness, alkalinity, pH, and chlorine actually do to your coffee?
- How do common water sources compare for brewing?
- How does the right water profile change by brew method?
- How can you improve your water at home right now?
- How do you test your tap water and tune it to the right profile?
- Quick decision checklist for common U.S. tap-water situations
- Key Takeaways
- The variable most home brewers ignore until it’s too late
- Zscoffee has the beans and gear to put your optimized water to work
- Useful sources
What do TDS, hardness, alkalinity, pH, and chlorine actually do to your coffee?
Water is roughly 98–99% of a drip brew and over 90% of an espresso shot. That ratio means even minor shifts in mineral balance register clearly in the cup. Understanding five core measurements tells you almost everything you need to know about water’s impact on extraction.
-
TDS (total dissolved solids). TDS measures the total concentration of dissolved minerals and compounds in parts per million (ppm). The SCA targets a TDS near 150 ppm, with an acceptable window of 75–250 ppm. Below 75 ppm, water is too “empty” to extract coffee compounds efficiently — the result is flat and thin. Above 250 ppm, the water is already so loaded with minerals that it competes with extraction, often producing a dull or chalky cup.
-
Hardness (calcium and magnesium). These two minerals are the primary drivers of extraction. Calcium binds to coffee’s organic acids and pulls flavor compounds into solution; magnesium tends to highlight brightness and sweetness. The SCA targets calcium hardness within a moderate range as CaCO₃. Too little hardness and the brew tastes weak; too much and it skews bitter and over-extracted.
-
Alkalinity (bicarbonate/KH). Bicarbonate acts as an acid buffer. A moderate level recommended by the SCA — protects the brew from tasting sour while preserving the coffee’s natural acidity. Push alkalinity above 75 ppm and it starts neutralizing the acids that give specialty coffee its complexity, leaving a flat, muted cup. This is one of the most underestimated variables in home brewing.
-
pH. The SCA’s target range is 6.5–7.5, which is close to neutral. In practice, if your water hits the right TDS and alkalinity, pH usually lands in range automatically. What overrides pH as a priority is odor.
-
Chlorine and chloramine. Municipal water is routinely treated with chlorine or the more persistent chloramine. Either one produces off-flavors that no amount of mineral tuning will fix. Carbon filtration removes both and is the recommended first step before adjusting anything else.
Pro Tip: Chloramine does NOT evaporate overnight the way free chlorine does. Standard aeration or leaving water in an open pitcher won’t remove it. You need a catalytic carbon filter or a specific chloramine-rated cartridge.
| Metric | Target range | What goes wrong outside it |
|---|---|---|
| TDS | 75–250 ppm (ideal ~150) | Below 75: flat; above 250: dull/chalky |
| Calcium hardness | 50–175 ppm as CaCO₃ | Too low: weak; too high: bitter |
| Alkalinity (KH) | 40–70 ppm as CaCO₃ | Above 75: muted acidity and flat flavor |
| pH | 6.5–7.5 | Outside range: sour or harsh notes |
| Chlorine/chloramine | — | Any amount: off-flavors |
How do common water sources compare for brewing?
Not all water is created equal, and the differences matter more than most home brewers expect. Here is a side-by-side look at the most common coffee brewing water types, followed by the practical trade-offs for each.
| Water type | Typical TDS (ppm) | Chlorine present | Mineral balance | Consistency | Scale risk | Cost/convenience |
|---|---|---|---|---|---|---|
| Municipal tap | 50–400+ | Yes (usually) | Highly variable | Low | Medium–high | Very low / immediate |
| Carbon-filtered tap | 50–400+ | No | Variable | Medium | Medium–high | Low / easy |
| Bottled spring/mineral | 50–250 | No | Variable by brand | Medium | Medium | Medium / convenient |
| Distilled | ~— | No | None | High | None | Low / widely available |
| RO (unremineralized) | — | No | None | High | None | Medium (system cost) |
| RO + remineralized | 75–150 | No | Controlled | Very high | Low | Medium–high (setup) |
| Alkaline bottled | 50–150 | No | Variable | Medium | Low–medium | Medium–high |
| Softened (ion exchange) | Variable | Depends | High sodium | Medium | Low (scale) | Low if already installed |
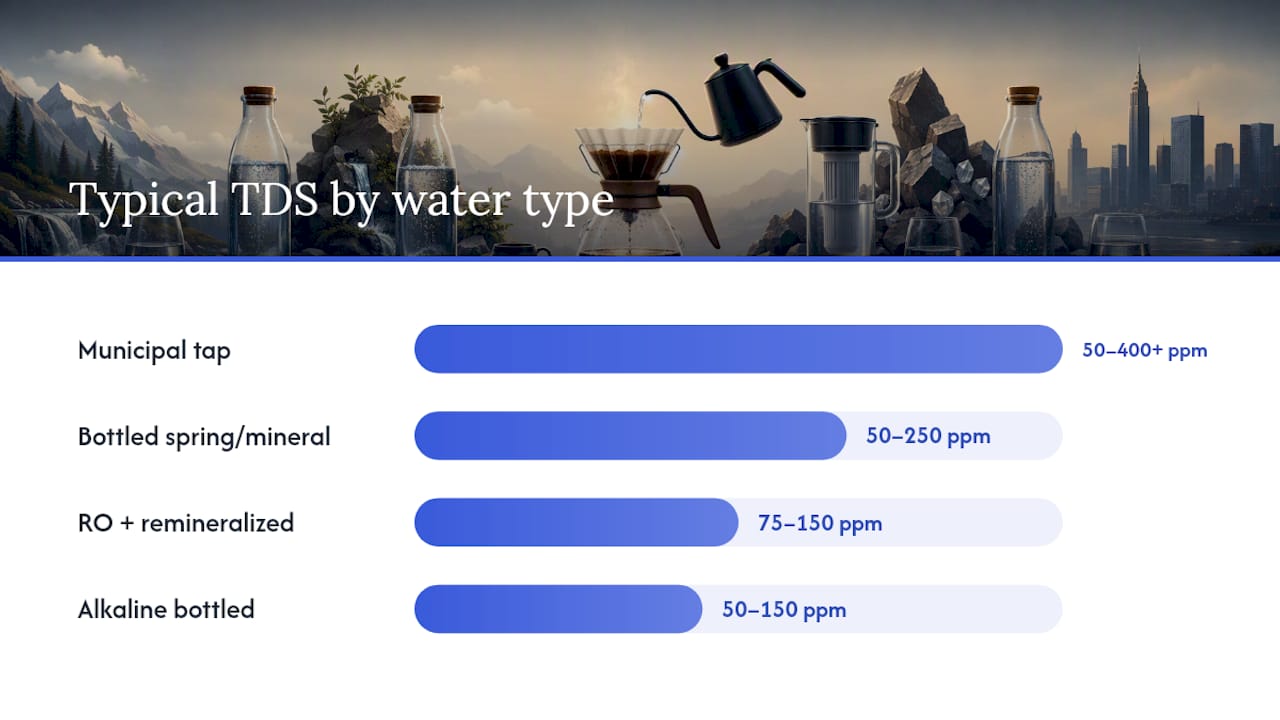
Tap water is the starting point for most people. The problem is variability: municipal TDS can swing from under 50 ppm in the Pacific Northwest to over 400 ppm in parts of the Southwest. Chlorine or chloramine is almost always present. Regional variation across the U.S. is significant, which is why a single “use tap water” recommendation is meaningless without knowing your local supply.
Carbon-filtered tap is the fastest upgrade. It removes chlorine and chloramine without stripping minerals, so if your tap water’s TDS and hardness are already in a reasonable range, a carbon pitcher or inline filter may be all you need.
Bottled spring or mineral water is a reliable short-term fix. Always check the label for TDS, calcium, magnesium, and bicarbonate before committing to a brand. A bottle showing TDS within the 75–250 ppm range with moderate calcium and low bicarbonate is a solid choice for pour-over or drip.
Distilled and unremineralized RO water should not be used straight for brewing. With near-zero TDS, they extract coffee compounds unevenly, producing a hollow, almost papery cup. They also corrode some metal components over time.
RO + remineralized is the most consistent option available to home brewers. It provides the best reproducibility because you control every variable from the start and reliably achieve TDS within the 75–250 ppm range. The setup cost is higher, but the per-cup cost is low once the system is running.
Softened water (ion exchange) trades calcium and magnesium for sodium. The result is low scale risk but a mineral profile that suppresses extraction and can add a faintly salty or flat character. Avoid it for brewing unless you have no other option.
How does the right water profile change by brew method?
Different brew methods interact with water chemistry differently. Espresso is the most sensitive because pressure amplifies every mineral interaction. Pour-over is highly responsive to alkalinity and chlorine. French press and cold brew are more forgiving but still benefit from clean, moderately mineralized water.
| Brew method | Suggested TDS | Hardness notes | Scale risk | Key sensitivity |
|---|---|---|---|---|
| Pour-over / drip | 75–250 ppm (ideal 100–175) | Moderate Ca/Mg | Low–medium | Alkalinity and chlorine |
| Espresso | 75–150 ppm | GH ~50–70 ppm CaCO₃, KH ~40–50 | High | Scale, over-extraction |
| French press | 75–250 ppm (ideal 100–150) | Moderate | Low | Chlorine off-flavors |
| Cold brew | 75–250 ppm (ideal 100–175) | Moderate | None | Chlorine, high bicarbonate |
For espresso specifically, the lower TDS preference (75–150 ppm) is not arbitrary. Pressure extraction at 9 bars pulls compounds much more aggressively than gravity-fed methods, so starting with softer water reduces the risk of over-extraction and protects the boiler from scale. Bottled options like Volvic and Crystal Geyser have mineral profiles suitable for espresso water, making them practical choices for home machine owners who aren’t ready to set up RO.
Pour-over is where alkalinity matters most. High bicarbonate suppresses the bright, nuanced acidity that makes a well-sourced single-origin shine. If your pour-over tastes flat despite good beans and a correct grind, high alkalinity is often the culprit.
Cold brew: avoid chlorinated water and anything with very high bicarbonate. The long steep time (12–24 hours) amplifies both off-flavors and alkalinity’s acid-blunting effect more than any hot method does.
How can you improve your water at home right now?
Start with the lowest-cost fix that addresses your actual problem, then upgrade if needed. Here is a stepwise path from quick and cheap to full control.
-
Carbon pitcher or inline filter (a low-cost option). Removes chlorine and chloramine immediately. Brands like Brita with a standard carbon block or a dedicated coffee-focused pitcher work well for most U.S. municipal supplies with moderate mineral content. This is the right first move for the majority of home brewers.
-
Bottled spring water as a practical short-term option. When your tap water’s TDS or hardness is far outside range, bottled water is a practical bridge. Look for labels showing TDS 75–250 ppm, calcium 20–50 mg/L, magnesium 5–20 mg/L, and bicarbonate below 50 mg/L. Checking the bottle’s mineral breakdown takes 30 seconds and saves a lot of guesswork.
-
Dedicated coffee mineral packets designed for water remineralization. These are pre-measured mineral sachets designed to be added to a gallon of distilled or RO water. They hit SCA-adjacent targets without any chemistry knowledge. The downside is ongoing cost and the need to buy distilled water separately.
-
RO system + remineralization (for precise water control with higher setup cost). RO combined with remineralization gives you a blank-slate starting point every time. Add minerals back using a calibrated recipe: a common DIY approach uses food-grade magnesium sulfate (Epsom salt) and calcium chloride dissolved in precise quantities, then measured with a TDS meter before brewing. Start with a small test batch, brew, taste, and re-measure before scaling up.
Pro Tip: If you’re on a municipal supply that uses chloramine (common in cities like Chicago, New York, and Los Angeles), a standard carbon pitcher will reduce but not fully eliminate it. Look for filters rated specifically for chloramine removal, such as catalytic carbon blocks from brands like Aquasana or Clearly Filtered.
- For soft water regions (Pacific Northwest, parts of the Southeast): remineralization is your priority, not filtration.
- For hard water regions (Southwest, Midwest): RO or a dedicated descaling pre-filter protects both your cup and your equipment.
- For inconsistent municipal supplies: RO + remineralize is the only approach that removes the variable entirely.
How do you test your tap water and tune it to the right profile?
Testing takes less time than most people expect. A basic protocol covers the main variables in under 15 minutes.
Pro Tip: Run your TDS test at different times of day and on different days of the week. Municipal water composition can shift, especially after heavy rain or seasonal treatment changes. A single reading is a snapshot, not a guarantee.
- Step 1: Smell the water. Fill a glass, let it sit for 30 seconds, and smell it. Any chlorine or chemical odor means filtration is your first priority, before anything else.
- Step 2: Pull your municipal water quality report. Every U.S. water utility is required to publish an annual Consumer Confidence Report (CCR). Search “[your city] water quality report” or visit the EPA’s water quality data portal. The CCR lists TDS, hardness, pH, and disinfectant type.
- Step 3: Measure TDS with a pen meter. A basic TDS pen costs around $15 and gives you an instant reading. Dip it in a glass of your tap water and note the number. Under 75 ppm means you need to remineralize; over 250 ppm means you need dilution or RO.
- Step 4: Test strips for hardness and alkalinity. Aquarium-grade test strips (available at most pet stores or on Amazon) measure general hardness (GH) and carbonate hardness (KH) cheaply. They’re not lab-precise, but they tell you whether you’re in range.
- Step 5: Optional lab test. For a full mineral panel, services like SimpleLab’s Tap Score provide a detailed water analysis mailed to your door. Useful if you’re dialing in espresso or building a precise DIY mineral recipe.
Tuning protocol:
- Chlorine smell → carbon filter, done.
- TDS above 250 ppm → RO or blend tap with distilled water (50/50 as a starting point, then re-measure).
- TDS considered low for brewing purposes → add a mineral packet or a calibrated DIY recipe before brewing.
- Alkalinity above 75 ppm → RO or dealkalization; blending with distilled water also lowers it.
- Hardness below 50 ppm → add magnesium sulfate and calcium chloride per a measured recipe.
Quick decision checklist for common U.S. tap-water situations
Match your situation to the action below. No chemistry degree required.
- Traveling or temporary setup → Grab a bottled spring water with TDS 75–150 ppm. Check the label for bicarbonate; below 50 mg/L is ideal. Practical home-brewer guidance consistently points to this as the fastest no-equipment fix.
Key Takeaways
The best water for coffee is chlorine-free, moderately mineralized, and matched to your brew method — with TDS near 150 ppm as the practical center of the SCA’s 75–250 ppm acceptable range.
| Point | Details |
|---|---|
| Remove chlorine first | Carbon filtration is the fastest, lowest-cost fix for most U.S. municipal supplies. |
| Target TDS 75–250 ppm | The SCA’s acceptable range; aim near 150 ppm for balanced extraction across most brew methods. |
| Match water to method | Espresso prefers TDS 75–150 ppm and lower hardness; pour-over is most sensitive to alkalinity and chlorine. |
| RO + remineralize for full control | Combining reverse osmosis with a calibrated mineral recipe reliably achieves TDS within the 75–250 ppm range and delivers café-level consistency. |
| Zscoffee brewing accessories | Zscoffee’s brewing accessories and specialty beans pair directly with optimized water for a complete home setup. |
The variable most home brewers ignore until it’s too late
The coffee world spends enormous energy on bean origin, roast profiles, and grind size. Water gets treated as an afterthought — something you fix once and forget. That’s a mistake, and it’s a particularly costly one for espresso machine owners.
Here’s what most guides understate: alkalinity is a bigger flavor variable than hardness for the majority of home brewers in the U.S. Hardness gets all the attention because it causes visible scale. But it’s bicarbonate that quietly flattens the cup. A specialty-grade Ethiopian natural that should taste of blueberry and jasmine will taste like generic brown coffee if your water’s alkalinity is running at 120 ppm. The minerals are doing their job; the bicarbonate is erasing the result.
The second thing worth saying plainly: regional water variation in the U.S. is large enough that generic advice (“just use filtered water”) is nearly useless. A home brewer in Portland, Oregon is starting with soft, low-TDS water that needs remineralization. A home brewer in Scottsdale, Arizona is dealing with TDS that can exceed 400 ppm and hardness that will calcify an espresso machine in months. The fix is different in each case, and a $15 TDS pen plus a free municipal water report tells you which situation you’re actually in.
The practical takeaway: test first, then treat. Most people do it backwards — they buy a filter based on what they’ve read, then wonder why the cup didn’t improve. Spend five minutes with a TDS pen and your city’s Consumer Confidence Report before spending money on equipment.
Zscoffee has the beans and gear to put your optimized water to work
Once your water is dialed in, the next variable is what you’re brewing. Zscoffee’s range of specialty instant coffee and cold brew gives you a direct way to taste the difference that better water makes, without changing anything else in your setup. The cold brew in particular rewards clean, moderately mineralized water — the long steep amplifies every quality in the water, good or bad.
Browse the full Zscoffee range at zscoffee.shop and pick a coffee that matches the flavor profile your optimized water is now ready to deliver.
Useful sources
The following sources informed the guidance and numeric targets in this article. Each is worth reading directly for deeper context.
- BrewFYI — Brew Water Chemistry
- Barista Magazine — Something in the water: how water chemistry affects the taste of coffee
- Crystal Quest — Best water for coffee
- Water for Extraction — Composition recommendations and treatment (ResearchGate)
- Takumi Brewing Lab — Water quality for coffee
- Coffeenatics — Best water for coffee minerals
- Home Espresso Lab — Water for espresso
- Pure Water Products — Water and coffee
This article is general educational information, not professional advice. Water chemistry varies significantly by location. Consult your municipal water utility’s Consumer Confidence Report or a water treatment professional for guidance specific to your supply.