
TL;DR:
- The bloom releases CO2 to improve water saturation and flavor extraction.
- Proper blooming timing and technique are essential for a balanced, flavorful cup.
- Advanced methods like pulse pouring and distribution tools can optimize or replace traditional blooming.
Most home brewers treat the bloom as optional, a nice-to-have ritual before the real brewing begins. That’s a mistake that costs you flavor every single time. The bloom is the moment hot water first contacts your coffee grounds, triggering a release of carbon dioxide gas trapped during roasting. How you handle those first 30 to 45 seconds directly shapes whether your cup tastes bright and balanced or flat and muddled. This guide breaks down exactly what the bloom is, why it matters more than most people realize, and how to execute it well across every brewing method you use.
Table of Contents
- What is coffee bloom and why does it matter?
- Key variables that affect the bloom
- Bloom techniques: unlocking flavor at home
- Recognizing and troubleshooting bloom issues
- Expert approaches and advanced bloom strategies
- Perspective: Why blooming is both science and art
- Taste the difference: Elevate your coffee with expert tools and beans
- Frequently asked questions
Key Takeaways
| Point | Details |
|---|---|
| Bloom is crucial | Proper blooming ensures even water saturation and unlocks better coffee flavor. |
| Variables matter | Grind size, roast, temperature, and water quality all impact the bloom’s effectiveness. |
| Technique flexibility | Different brewing methods and even experts use varied bloom approaches—find what works for you. |
| Troubleshoot by cues | Visual signs, like bubbling and foam, reveal if the bloom phase needs adjustment. |
| Experiment to perfect | Adapt and test bloom methods to suit your beans and taste preferences for the best results. |
What is coffee bloom and why does it matter?
When freshly roasted coffee is ground and hot water hits it, you’ll see a foamy, bubbling mass rise up from the grounds. That’s the bloom. It’s not decoration. It’s CO2 escaping from the coffee cells where it was locked in during the roasting process. The hotter and faster the roast, the more gas gets trapped.
Here’s why this matters for your cup: CO2 is hydrophobic, meaning it actively repels water. If you pour all your brew water over grounds that are still full of gas, the water can’t properly saturate the coffee. You end up with uneven extraction, where some areas of the bed over-extract and others barely get touched at all.
Proper blooming prevents CO2 from interfering with water saturation, reducing channeling and enabling even extraction of flavors.
Uniform saturation is the foundation of a flavorful cup. When every particle gets equal contact with water, you pull out the right compounds in the right order: first the acids and brightness, then the sweetness, then the body. Skip the bloom and that sequence falls apart.
The bloom matters most in pour-over brewing, but it’s relevant everywhere:
- Pour-over: CO2 escape is visible and critical for even bed saturation
- French press: Blooming encourages uniform extraction before the steep
- Espresso: Pre-infusion serves the same purpose, letting grounds hydrate before full pressure hits
- Cold brew: Less relevant since cold water extracts slowly and CO2 dissipates over time
Understanding the coffee bloom science behind this step helps you see it not as a ritual but as a functional part of the brew. It’s also the first thing to check when you want to unlock coffee extraction and push your results further.
With the importance of bloom now clear, let’s look at the main factors that influence it.
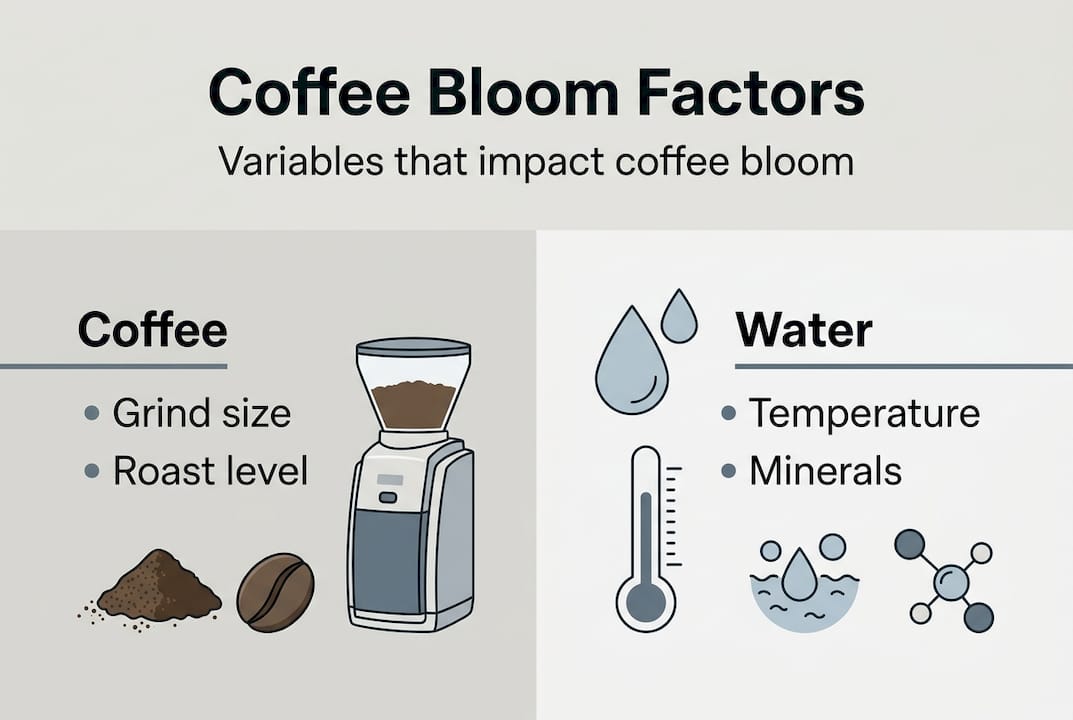
Key variables that affect the bloom
Not every bloom looks the same. Some coffees erupt into a dramatic dome of foam. Others barely bubble. The difference comes down to a handful of variables you can actually control.
Grind size plays a big role. Finer grinds have more surface area and trap more CO2 per gram of coffee. They need a slightly longer bloom to fully off-gas before brewing. Coarser grinds release CO2 faster, so the bloom is shorter and less dramatic.
Roast level is probably the biggest factor. Darker roasts go through more intense heat, which generates far more CO2 than lighter roasts. A fresh dark roast will bloom aggressively. A light roast from the same harvest date will bloom more gently. Variables affecting bloom include grind size, temperature, and roast level, with lighter roasts being less vigorous overall.
Water temperature matters too. The optimal range for blooming is 92 to 96°C (198 to 205°F). Too cool and the gas doesn’t release quickly enough. Too hot and you risk scorching delicate compounds in lighter roasts.
Water mineral content is often overlooked.
| Variable | Effect on bloom | Recommended adjustment |
|---|---|---|
| Fine grind | More CO2, bigger bloom | Extend bloom 5 to 10 seconds |
| Dark roast | Very vigorous bloom | Allow full 45 seconds |
| Light roast | Subtle bloom | 30 seconds is usually enough |
| Hard water | Larger foam cap | Use filtered water for balance |
| Low temperature | Slow gas release | Stay above 92°C |
Pro Tip: Use filtered water with balanced minerals, ideally around 150 ppm total dissolved solids, for the most consistent bloom and extraction results.
These variables directly affect how you should enhance coffee flavor at home. They also connect to processing methods and flavor, since natural-process coffees often retain more CO2 and bloom more actively than washed coffees.
Understanding these variables allows you to adjust your bloom phase and enhance results.
Bloom techniques: unlocking flavor at home
Knowing why the bloom matters is one thing. Executing it well is another. Here’s how to approach it across the most common brewing methods.
- Pour-over bloom: Slowly pour water equal to about twice the weight of your dry coffee grounds, so 30g of coffee gets 60g of water. Start from the center and spiral outward to wet all the grounds. Wait 30 to 45 seconds before continuing your pour. You should see the grounds swell and bubble.
- French press bloom: Add your grounds, then pour enough hot water to just cover them. Give the slurry a gentle stir to make sure all grounds are wet. Wait 30 seconds before adding the rest of your water and starting the steep.
- Espresso pre-infusion: Most modern espresso machines offer a pre-infusion setting that lets low-pressure water soak the puck before full extraction pressure kicks in. This is the espresso equivalent of blooming.
- Moka pot: Pour hot water into the bottom chamber before assembling to reduce heat exposure time, which mimics a gentler pre-infusion effect.
Agitation during the bloom is a debated topic. A gentle swirl or stir helps ensure all grounds contact water, which improves saturation. But too much agitation causes fines migration, where the smallest coffee particles move to the bottom of the filter and create resistance or uneven flow. Swirling or stirring improves saturation but excess agitation causes fines migration, so keep it light.
Pro Tip: If you’re using pulse pouring, where you add water in multiple small pours throughout the brew, a dedicated bloom phase may not be essential since each pulse naturally allows some off-gassing.
For deeper guidance on mastering blooming techniques or exploring how coffee varietals and brewing methods interact, those resources will help you go further.
Now that you know the core variables and the techniques, what outcomes should you be looking for?
Recognizing and troubleshooting bloom issues
The bloom tells you a lot about your coffee before you even taste it. Learning to read those visual cues is one of the fastest ways to improve your brewing.
What to watch for:
- Large, domed foam cap: Fresh coffee with high CO2 content, usually within 2 to 4 weeks of roast date
- Flat or minimal bubbling: Stale coffee, or beans roasted more than 6 to 8 weeks ago
- Uneven bloom: Inconsistent grind or uneven water distribution during the pour
- Very aggressive bubbling that collapses fast: Very fresh dark roast, may need a longer bloom or a day of rest
| Bloom symptom | Likely cause | Fix |
|---|---|---|
| No bloom | Stale coffee | Buy fresher beans |
| Flat bloom | Light roast or old stock | Extend bloom time slightly |
| Channeling visible | Uneven saturation | Improve pour technique |
| Bitter taste | Over-extraction | Shorten brew, adjust grind |
| Sour taste | Under-extraction | Extend bloom, finer grind |
Uniform saturation is critical for pour-over but also applies to immersion methods and espresso pre-infusion, so these fixes apply broadly.
If you’re consistently running into extraction problems, the solving extraction problems guide covers the full picture. And if you want to understand how coffee origins and flavor affect bloom behavior, that context helps you set realistic expectations for different beans.
With troubleshooting in hand, what do experts actually do differently, and what can you borrow from their playbook?
Expert approaches and advanced bloom strategies
Here’s something that surprises many home brewers: at the highest level of competition, baristas don’t always do a traditional bloom at all.
Bloom isn’t always a separate step in competitions, where pulse pouring or distribution tools may replace it entirely for greater precision.
Pulse pouring involves adding water in short, controlled bursts throughout the brew. Each burst allows CO2 to escape before the next pour, effectively spreading the bloom effect across the entire brew time rather than concentrating it at the start. This gives you more control over extraction and reduces the risk of channeling.
Distribution tools, like WDT (Weiss Distribution Technique) needles for espresso or stirring tools for pour-over, physically break up clumps and ensure even particle distribution before water ever touches the grounds. When grounds are perfectly distributed, uniform saturation happens more easily, with or without a dedicated bloom phase.
Key takeaways from expert practice:
- Pulse pouring can replace a traditional bloom for experienced brewers
- Distribution tools reduce reliance on bloom for even saturation
- Very fresh beans sometimes benefit from a 24 to 48 hour rest after roasting before brewing
- Soft, filtered water is generally preferred over hard water despite the larger bloom hard water produces
Exploring blends for richer flavors can also give you a better baseline for experimenting with bloom timing, since blends are often roasted to a consistent profile that behaves predictably.
With all this fresh perspective, let’s take a step back for a candid view on why blooming is an evolving practice.
Perspective: Why blooming is both science and art
We’ve spent years watching home brewers obsess over bloom time to the second, convinced there’s one correct answer. There isn’t. The bloom is grounded in real chemistry, CO2 release, saturation, extraction dynamics, but how you apply that chemistry depends on your beans, your gear, your water, and honestly, your taste preferences.
The most important thing we’ve learned is this: expert routines are not the destination. They’re invitations to experiment. A competition barista skipping the bloom with pulse pouring isn’t telling you to skip yours. They’re showing you that the goal is even extraction, and there are multiple paths to get there.
Light roast single origins from high-altitude farms bloom differently than dark blends from a commercial roaster. Ethiopian naturals behave differently than Colombian washed coffees. No single bloom method fits every scenario.
Start with the fundamentals: 2x water ratio, 30 to 45 seconds, fresh beans, right temperature. Then start adjusting one variable at a time. The bloom stops feeling like a step in a recipe and starts feeling like a conversation with your coffee. That shift in mindset is where real brewing skill develops.
Taste the difference: Elevate your coffee with expert tools and beans
Everything you’ve read here only works as well as the coffee and equipment you’re working with. Fresh, high-quality beans make the bloom visible and meaningful. Stale beans make it invisible and irrelevant.

At Z’s Coffee, we source specialty coffee beans with roast dates you can actually trust, so your bloom tells you something real about what’s in your cup. If you’re also looking to upgrade your setup, our brewing accessories are chosen to support better technique at every step. Better ingredients and better tools don’t just improve your bloom. They improve everything that follows it.
Frequently asked questions
What does the coffee bloom do during brewing?
The bloom releases carbon dioxide, allowing water to saturate grounds evenly for balanced extraction and better flavor. Without it, CO2 blocks water contact and causes uneven extraction.
How long should I let coffee bloom when brewing at home?
A bloom time of 30 to 45 seconds works well for most fresh coffee. Roast level and grind size affect timing, so very fresh or dark roasts may need a few extra seconds.
Do I need to bloom coffee for immersion methods like French press?
Yes, blooming helps with even extraction in all manual methods including French press. Uniform saturation is critical for pour-over but also applies to immersion brewing and espresso pre-infusion.
Can I skip the bloom if I use pulse pouring?
Many experts skip a separate bloom when using pulse pouring. Pulse pouring or distribution tools can replace the traditional bloom phase and may improve precision.
Why doesn’t my coffee bloom much?
Minimal bloom usually means your coffee is stale or has been sitting too long past its roast date. Small or no bloom is a reliable indicator of low CO2 content from aging or under-roasting.
Recommended
- Coffee bloom science: flavor, freshness & brewing mastery – Z’s Coffee
- Unlock Coffee Extraction: Brew Better, Bolder Flavor – Z’s Coffee
- How to enhance coffee flavor: brew, beans & tips – Z’s Coffee
- Creative coffee flavor pairing ideas for richer brews – Z’s Coffee
- Coffee blends: Master flavors & brewing techniques – Adira Coffee US